Maintained in partnership with Redis, the Redis Docker Official Image (DOI) lets developers quickly and easily containerize a Redis instance. It streamlines the cross-platform deployment process — even letting you use Redis with edge devices if they support your workflows.
Developers have pulled the Redis DOI over one billion times from Docker Hub. As the world’s most popular key-value store, Redis helps apps concurrently access critical bits of data while remaining resource friendly. It’s highly performant, in-memory, networked, and durable. It also stands apart from relational databases like MySQL and PostgreSQL that use tabular data structures. From day one, Redis has also been open source.
Finally, Redis cluster nodes are horizontally scalable — making it a natural fit for containerization and multi-container operation. Read on as we explore how to use the Redis Docker Official Image to containerize and accelerate your Redis database deployment.
In this tutorial:
- What is the Redis Docker Official Image?
- How to run Redis in Docker
- Configurations and modules
- Get up and running with Redis today
What is the Redis Docker Official Image?

The Redis DOI is a building block for Redis Docker containers. It’s an executable software package that tells Docker and your application how to behave. It bundles together source code, dependencies, libraries, tools, and other core components that support your application. In this case, these components determine how your app and Redis database interact.
Our Redis Docker Official Image supports multiple CPU architectures. An assortment of over 50 supported tags lets you choose the best Redis image for your project. They’re also multi-layered and run using a default configuration (if you’re simply using docker pull). Complexity and base images also vary between tags.
That said, you can also configure your Redis Official Image’s Dockerfile as needed. We’ll touch on this while outlining how to use the Redis DOI. Let’s get started.
How to run Redis in Docker
Before proceeding, we recommend installing Docker Desktop. Desktop is built upon Docker Engine and packages together the Docker CLI, Docker Compose, and more. Running Docker Desktop lets you use Docker commands. It also helps you manage images and containers using the Docker Dashboard UI.
Use a quick pull command
Next, you’ll need to pull the Redis DOI to use it with your project. The quickest method involves visiting the image page on Docker Hub, copying the docker pull command, and running it in your terminal:
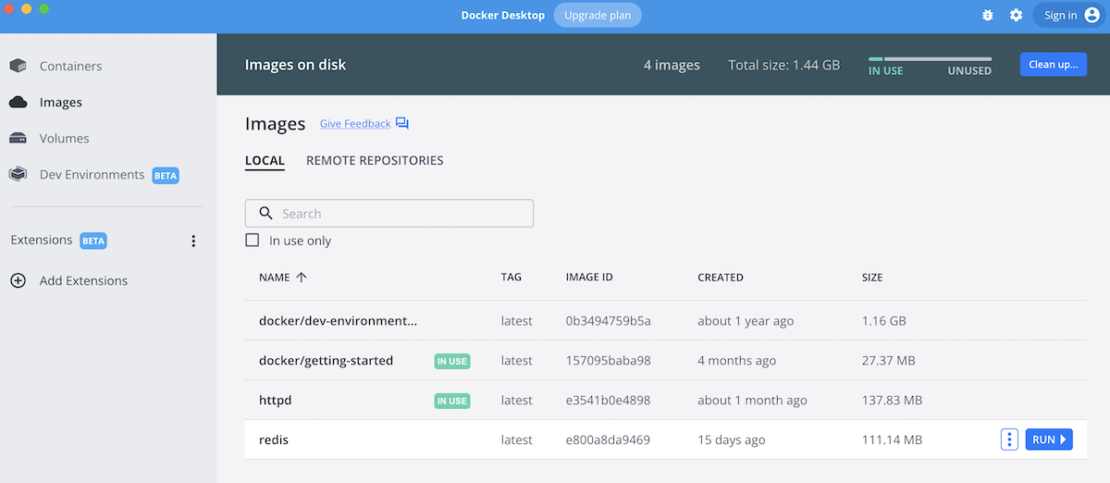
Your output confirms that Docker has successfully pulled the :latest Redis image. You can also verify this by hopping into Docker Desktop and opening the Images interface from the left sidebar. Your redis image automatically appears in the list:

We can also see that our new Redis image is 111.14 MB in size. This is pretty lightweight compared to many images. However, using an alpine variant like redis:alpine3.16 further slims your image.
Now that you’re acquainted with Docker Desktop, let’s jump into our CLI workflow to get Redis up and running.
Start your Redis instance
Redis acts as a server, and related server processes power its functionality. We need to start a Redis instance, or software server process, before linking it with our application. Luckily, you can create a running instance with just one command:
docker run --name some-redis -d redis
We recommend naming your container. This helps you reference later on. It also makes it easier to run additional commands that involve it. Your container will run until you stop it.
By adding -d redis in this command, Docker will run your Redis service in “detached” mode. Redis, therefore, runs in the background. Your container will also automatically exit when its root process exits. You’ll see that we’re not explicitly telling the service to “start” within this command. By leaving this verbiage out, our Redis service will start and continue running — remaining usable to our application.
Set up Redis persistent storage
Persistent storage is crucial when you want your application to save data between runs. You can have Redis write its data to a destination like an SSD. Persistence is also useful for keeping log files across restarts.
You can capture every Redis operation using the Redis Database (RDB) method. This lets you designate snapshot intervals and record data at certain points in time. However, that running container from our initial docker run command is using port 6379. You should remove (or stop) this container before moving on, since it’s not critical for this example.
Once that’s done, this command triggers persistent storage snapshots every 60 seconds:
docker run --name some-redis -d redis redis-server --save 60 1 --loglevel warning
The RDB approach is valuable as it enables “set-and-forget” persistence. It also generates more logs. Logging can be useful for troubleshooting, yet it also requires you to monitor accumulation over time.
However, you can also forego persistence entirely or choose another option. To learn more, check out Redis’ documentation.
Redis stores your persisted data in the VOLUME /data location. These connected volumes are shareable between containers. This shareability becomes useful when Redis lives within one container and your application occupies another.
Connect with the Redis CLI
The Redis CLI lets you run commands directly within your running Redis container. However, this isn’t automatically possible via Docker. Enter the following commands to enable this functionality:
docker network create some-network
docker run -it --network some-network --rm redis redis-cli -h some-redis
Your Redis service understands Redis CLI commands. Numerous commands are supported, as are different CLI modes. Read through the Redis CLI documentation to learn more.
Once you have CLI functionality up and running, you’re free to leverage Redis more directly!
Configurations and modules
Finally, we’ve arrived at customization. While you can run a Redis-powered app using defaults, you can tweak your Dockerfile to grab your pre-existing redis.conf file. This better supports production applications. While Redis can successfully start without these files, they’re central to configuring your services.
You can see what a redis.conf file looks like on GitHub. Otherwise, here’s a sample Dockerfile:
FROM redis
COPY redis.conf /usr/local/etc/redis/redis.conf
CMD [ "redis-server", "/usr/local/etc/redis/redis.conf" ]
You can also use docker run to achieve this. However, you should first do two things for this method to work correctly. First, create the /myredis/config directory on your host machine. This is where your configuration files will live.
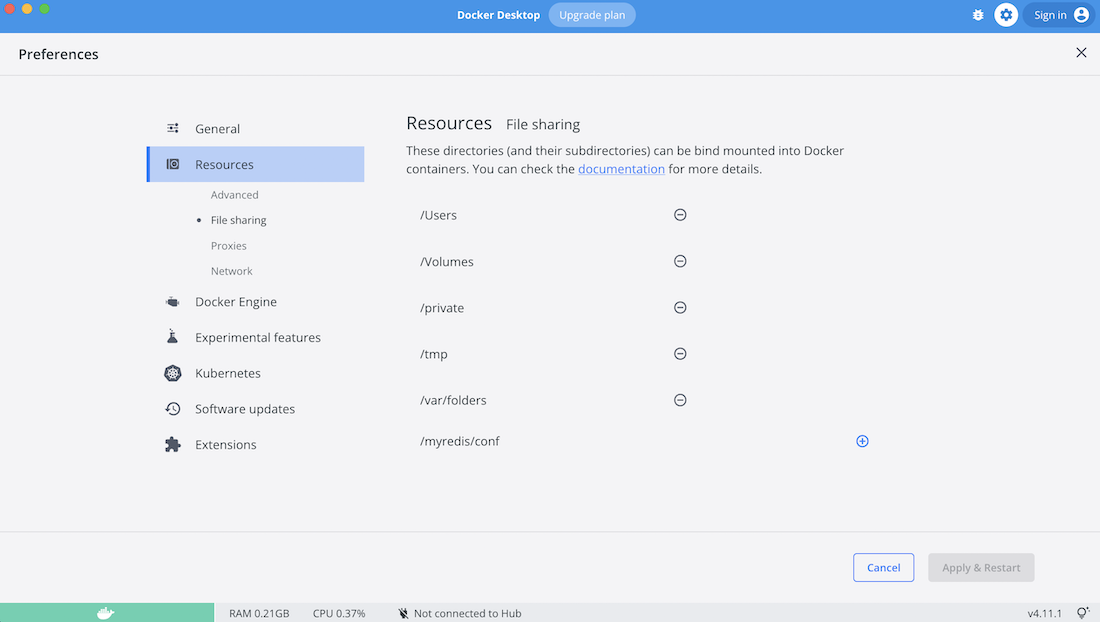
Second, open Docker Desktop and click the Settings gear in the upper right. Choose Resources > File Sharing to view your list of directories. You’ll see a grayed-out directory entry at the bottom, which is an input field for a named directory. Type in /myredis/config there and hit the “+” button to locally verify your file path:

You’re now ready to run your command!
docker run -v /myredis/conf:/usr/local/etc/redis --name myredis redis redis-server /usr/local/etc/redis/redis.conf
The Dockerfile gives you more granular control over your image’s construction. Alternatively, the CLI option lets you run your Redis container without a Dockerfile. This may be more approachable if your needs are more basic. Just ensure that your mapped directory is writable and exists locally.
Also, consider the following:
- If you edit your Redis configurations on the fly, you’ll have to use
CONFIG REWRITEto automatically identify and apply any field changes on the next run. - You can also apply configuration changes manually.
Remember how we connected the Redis CLI earlier? You can now pass arguments directly through the Redis CLI (ideal for testing) and edit configs while your database server is running.
Notes on using Redis modules
Redis modules let you extend your Redis service, and build new services, and adapt your database without taking a performance hit. Redis also processes them in memory. These standard modules support querying, search, JSON processing, filtering, and more. As a result, Docker Hub’s redislabs/redismod image bundles seven of these official modules together:
- RedisBloom
- RedisTimeSeries
- RedisJSON
- RedisAI
- RedisGraph
- RedisGears
- Redisearch
If you’d like to spin up this container and experiment, simply enter docker run -d -p 6379:6379 redislabs/redismod in your terminal. You can open Docker Desktop to view this container like we did earlier on.
You can view Redis’ curated modules or visit the Redis Modules Hub to explore further.
Get up and running with Redis today
We’ve explored how to successfully Dockerize Redis. Going further, it’s easy to grab external configurations and change how Redis operates on the fly. This makes it much easier to control how Redis interacts with your application. Head on over to Docker Hub and pull your first Redis Docker Official Image to start experimenting.
The Redis Stack also helps extend Redis within Docker. It adds modern, developer-friendly data models and processing engines. The Stack also grants easy access to full-text search, document store, graphs, time series, and probabilistic data structures. Redis has published related container images through the Docker Verified Publisher (DVP) program. Check them out!

Feedback
0 thoughts on "How to Use the Redis Docker Official Image"